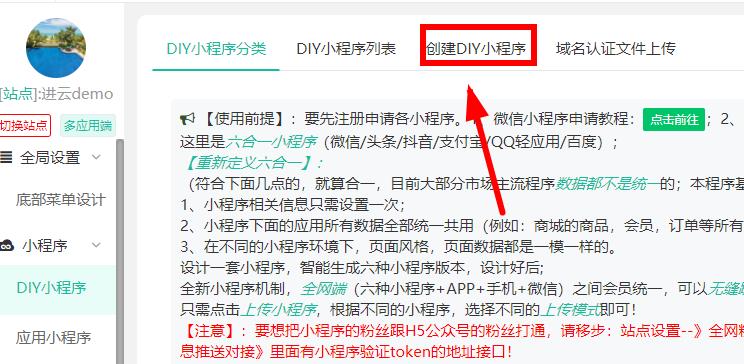
一:先看示例:
1、创建一个DIY小程序--上传小程序--微信小程序--一键上传--小程序版本--下载小程序包;

2、大概学习小程序代码包:
app.js里面的setting,配置了小程序ID,站点ID,域名,接口地址等;
core文件里面对应的系统的前端页面:
比如会员中心页面:custom/actions/member/home.php对应的小程序页面就是:core/member/home/index类似jy_weishop的是插件的前端页面;
商城首页页面,/addons/jy_weishop/index.php;对应的小程序页面就是:jy_weishop/index/index;3、单个小程序页面的分析:
示例:会员中心页面,获取页面数据的方法:onLoad: function (options){ var the = this; wx.setNavigationBarTitle({'title':the.data.pagetitle}); the.getpagedata(); }, getpagedata: function (){ var the=this; app.util.get(app.access,function(res){ if(!res.item.nickname || !res.item.avatar || res.item.nickname=='匿名用户'){ var fansinfo = wx.getStorageSync('userInfo'); if(!fansinfo){ var ShowAuthM=true } } the.setData({ pagedata:res, ShowAuthM:ShowAuthM, pluginnav:app.session.menus, action:app.access.plugin+'/'+app.access.action+'/', }); }); },其中app.access就是当前页面的路由参数,大家可以打印一些这个数组,就可以一目了然了。如果是分享页面怎么传参?我们看看系统前端文章core/article/list/index.js页面if(opt && opt.fromuser){//为什么opt.fromuser可以判断是否传参呢?因为只有是分享的页面,都会默认传fromuser(分享人ID) var path=route.slice(0,-6).split('/'); app.access.plugin=path.shift();//所属插件标识,如果是系统标识就是core app.access.action=path.join('.');//页面路径,支持进云的短链解析:比如article.list就是/article/list/ app.access.query =app.util.made_query(opt,true);//传参内容:比如文章id=108&groupid=XX app.access.op=opt.op?opt.op:'';//页面动作比如:detail}如果是正常访问某文章:直接data-func="access" bindtap="click" data-params="core/article.list/detail/id={{item.id}}"就行,这时候opt是不需要传参的
二、其他相关小程序的常见问题:
1、小程序代码构成:
=========================================================
https://developers.weixin.qq.com/miniprogram/dev/framework/quickstart/code.html#JSON-配置
2、小程序wxml页面基础语法:
=========================================================
https://developers.weixin.qq.com/miniprogram/dev/reference/wxml/
3、常用一键替换:
=========================================================
wx:key="index" wx:for-item="" wx:for-index=""
data-func="access" bindtap="click" data-params=""
富文本模式:
<rich-text nodes=&quot;{{pagedata.goods.content}}&quot;></rich-text>
表单提交模式:
https://developers.weixin.qq.com/miniprogram/dev/component/button.html
<form bindsubmit=&quot;formSubmit&quot; report-submit=&quot;true&quot;>
<button formType=&quot;submit&quot; id=&quot;btn-submit&quot; class=&#39;external btn btn-danger block&#39;>保存地址</button>
</form>
手机绑定模式:
<button class=&quot;jylabel&quot; style=&quot;background:none;border-radius:10px;color:#f60&quot; open-type=&quot;getPhoneNumber&quot; bindgetphonenumber=&quot;mobile_login&quot;>绑定手机</button>
4、进云这边一些要替换掉的处理的:
=========================================================
<img 替换成为<image
ng-if=&quot;替换成为wx:if=&quot;{{
ng-show=&quot;替换成为wx:if=&quot;{{
ng-repeat=&quot;替换成为wx:for=&quot;{{
ng-model=&quot;替换成为value=&quot;{{
ng-click=&quot;post()&quot; 换成:data-func=&quot;post&quot; bindtap=&quot;click&quot; data-params=&quot;&quot;
ng-click=&quot;access_json()&quot; 换成:data-func=&quot;access&quot; bindtap=&quot;click&quot; data-params=&quot;&quot;
rem样式一键换成小程序rpx:在线生成:https://s.jinyunweb.com/jinyunui/rem2rpx.html |